Create Policy Package
Create Policy Package
For Lifecycle Notifications, Naming Convention to be applied to OneNote, Planner and Teams, first step is to create a Naming Convention, second step is to define a Policy and third step is to execute the Policy.
Following section describes the steps for creation of Policy Package.
Go to Teams Manager and click on tab "Settings".
Click on link "Policies" under "Governance".
Click on button "Create a Policy Package".
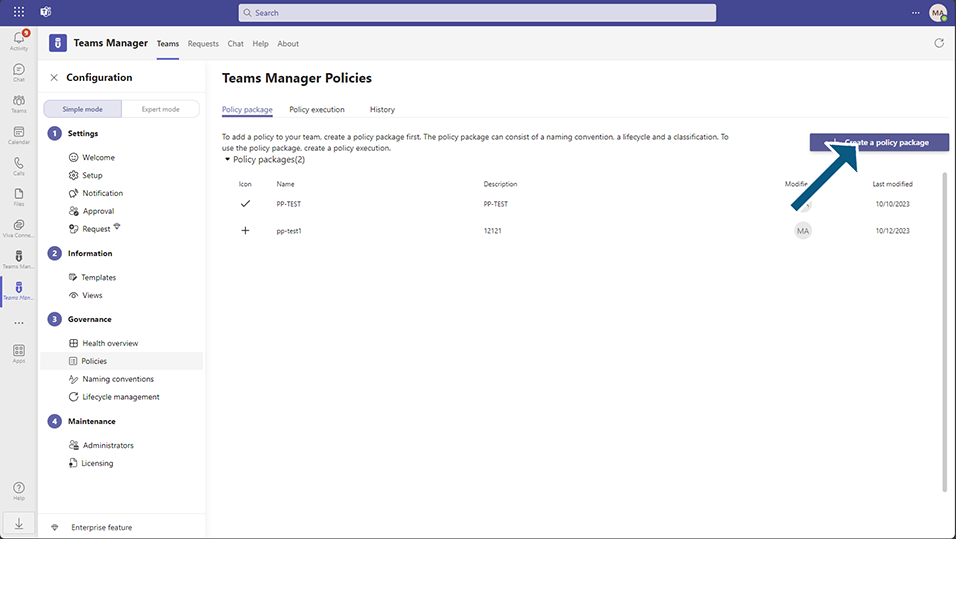
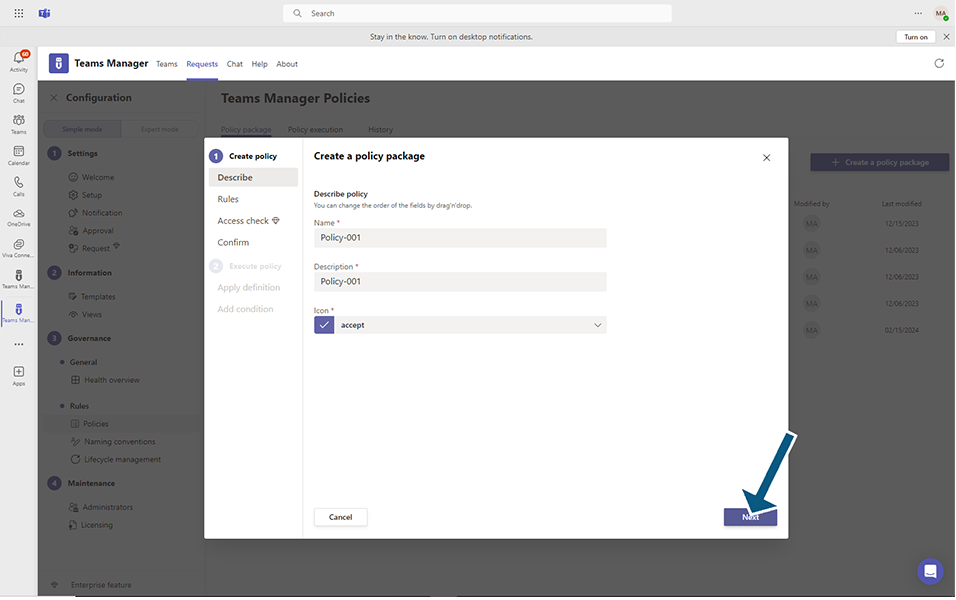
Enter the following details:
Field "Name": This is a text field which accepts alphanumeric characters. This is the name of the Policy definition that will be used. This is a mandatory field.
Enter value as "Policy-001".
Field "Description": This is a text field which accepts alphanumeric characters. This is the short description of the Policy that is used. This is a mandatory field.
Enter value as "Policy-001".
Field "Icon": This is the drop down field which is used for defining the policy. This is a mandatory field.
Select value as "Accept".
Click on Next button.
Enter following details:
Field "Naming Convention": This is the drop down field which is used to define which naming convention has to be used on this policy definition. This is not a mandatory field.
Select value as "NC-Test".
Note: Naming Convention NC-Test should be already available.
Field "Two Owner": This is the toggle field which is used to set the two owners to ON and OFF. When this toggle field is set to ON, two owners are mandatory when a Team is created.
Field "Default Owner" : Click on Manage button and user can select the default owners from this field. When Default owner is set, and this policy is applied, the default owner will be updated while creating the Teams. There is no restrictions to the number of users selected in default owner field. When more than 3 users are selected in Default owner field, 2 users are updated with initials and all other users are updated with +n(n number of users). On hoverover, the user names will be displayed.
NOTE: The new owners updated due to default owners in policy apply, will be highlighted while creation of the Team in Owners field.
Field "Default Member" : Click on Manage button and user can select the default members from this field. When Default member is set, and this policy is applied, the users added in default member will be updated along with the users entered while creating the Teams. There is no restrictions to the number of users selected in default member field. When more than 3 users are selected in Default member field, 2 users are updated with initials and all other users are updated with +n(n number of users). On hoverover, the user names will be displayed.
NOTE: The new owners updated due to default members in policy apply, will be highlighted while creation of the Team in Members field.
Field "Approver Group- Approval Enabled": This is a toggle field, when this field is set to ON, a drop down field is displayed below with list of all Approval Groups available.
This is mapped to Default Approval Group for the first time when the Teams Manager app is upgraded from the previous version. User can select any Approval Groups available.
Field "Approver Group- Approval Enabled": When this field is set to OFF, even though approval process is enabled, when Team is created and policy conditions are satisfied, instead of creation of Request, Teams are created without undergoing any Approval process.
Select Default Approval Group.
Field "LifeCycle": This is the drop down field which is used to define which lifecycle has to be used on this policy package. This is not a mandatory field.
Select value as "LC-Test".
Note: Lifecycle "LC-Test" should be already available.
Field "Force Visibility": This is the drop down field with options - No force, Private and Public.When No force is selected, policy doesnt overwrite the option selected by the user during Team creation for Private or Public.
If Force visibility is set to Private, during Team creation when user selects Public, policy overwrites and the visibility is forcefully set to Private.
If Force visibility is set to Public, during Team creation when user selects Private, policy overwrites and the visibility is forcefully set to Public.
This field "Force Visibility" will NOT be available if Enable public Teams is disabled in Settings-Requests.
Field "Force Guest Access": This is the drop down field that has options 'Allow guests', 'Disable guests' and 'No force'. Police overwrites the settings provided in Settings 'Guest Access disabled by default' toggle field.
Field "Classification-Force": This is a toggle field, when this field is set to ON, Select a Classification drop down is displayed below. Select any Classification. In this case, when a Team is created with some classification, irrespective of what classification the user select, Classification that is set in here will be updated in newly created Teams.
Select Force toggle field and enter the value as 'Internal Use".
Field "Sensitivity Label": This is the toggle field with force 'ON' and 'OFF'. When this toggle field is set to ON, drop down field is displayed to the user with all values of Sensitivity Labels displayed.
Select Force toggle field and enter the value as 'Confidential-Finance'.
When this field is set to OFF, there is no Classification drop down available and whatever value the user selects on classification field during Team Creation is updated in Teams.
Set this toggle field to OFF.
NOTE: If there are no classifications available, this field will NOT be displayed.
Click on Next button.
Access Check page is displayed for user with following fields:
Field "Enable access review process for team members": This toggle field should be set to ON, if Access check has to be performed for the Team members. If no access check is required, this field is set to OFF.
When this field is set to ON, all the other related fields of Access check are enabled in below panel.
Field "Set the number of days, access review will take place after" : This has dropdown options of 7 days, 30 days, 90 days and 180 days. Based on the number of days set in this field, Access check will be taking place.
Field "After how many days would you like to be notified if the check has not yet been completed? (Maximum 365 days)": This is a numeric field and user can enter up to 365 days. Based on the number of days entered in this field, user will be notified if Access check is not completed.
Field "Select who can check the access": This is a dropdown field with options- Owners, Approvers, Owners and Approvers. If option owners is selected, bot notifications related to Access review is sent to Team owners. If Approvers is selected, bot notifications are sent to Approvers for access review. If Owners and Approvers is selected, bot notifications is sent to both owners and approvers.
Enable posting in Team: This is a toggle field and when this field is set to yes, notifications related to Access Check is also displayed in Post on the Specific Teams in MS Teams. If this field is set to No, there will not be any notifications in MS Teams.
Hide inactive members and the last activity date: This is a toggle field and when this field is set to Yes, inactive users and the activity dates are not displayed in Access review dialog when access review is performed. If this field is set to No, inactive users and activity dates are displayed.
Click on Next button.

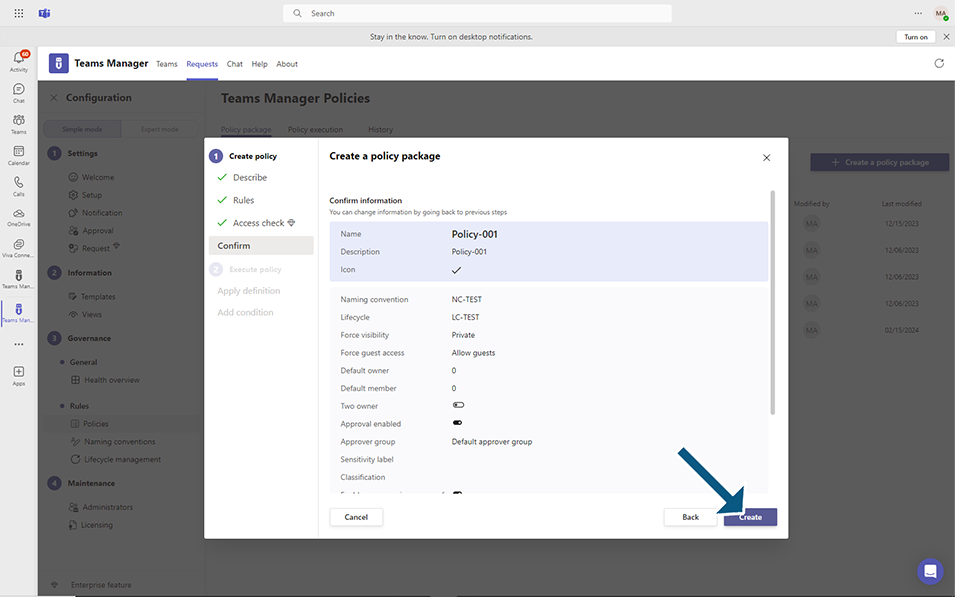
Policy Package summary page will be displayed with all fields in read only mode.
Click on button "Create".
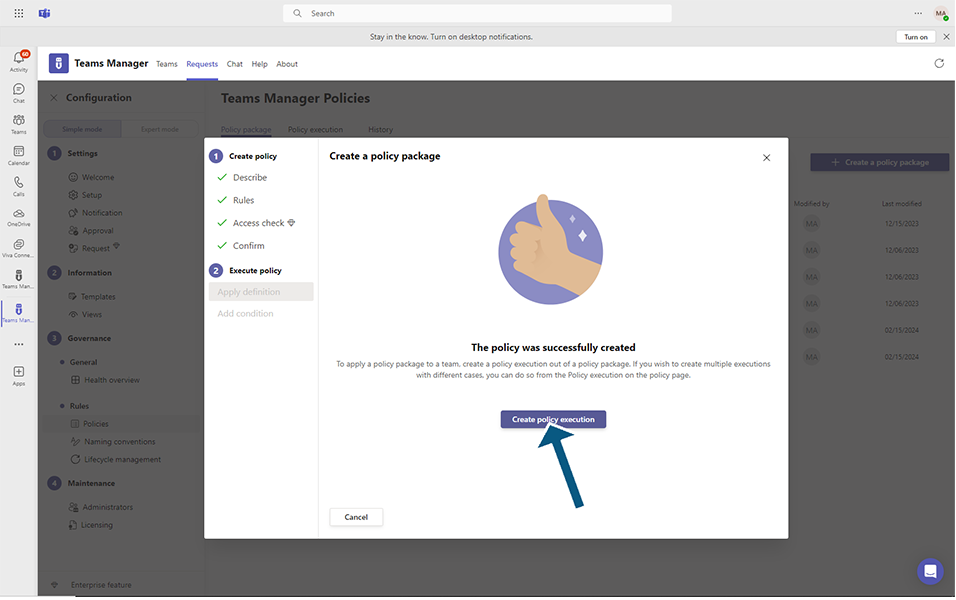
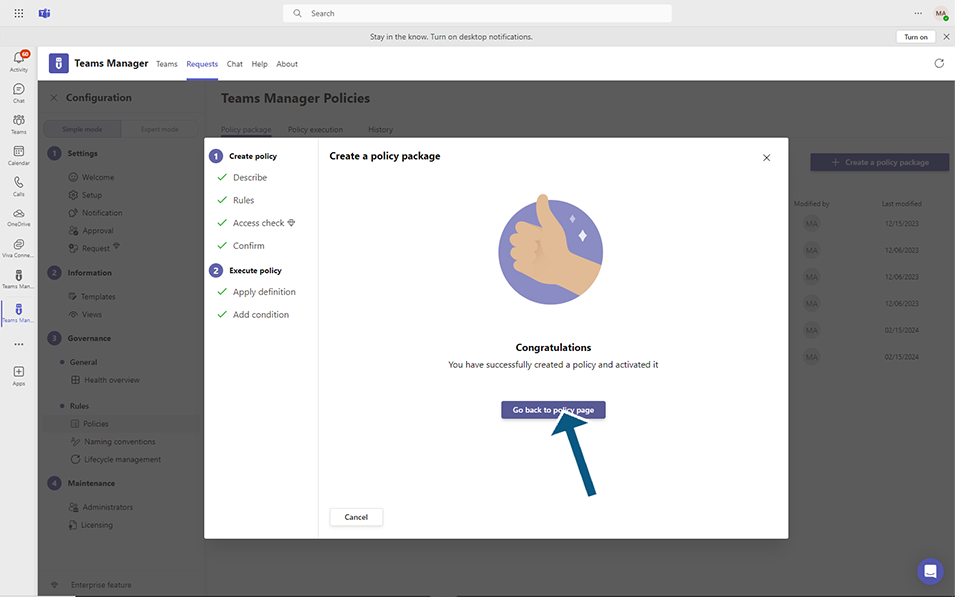
Policy Package was created successfully confirmation message is displayed to user.
From this page, user can also create Policy execution by clicking on Create Policy Execution button.
Newly created policy package will be selected by default.
Click on Next button.
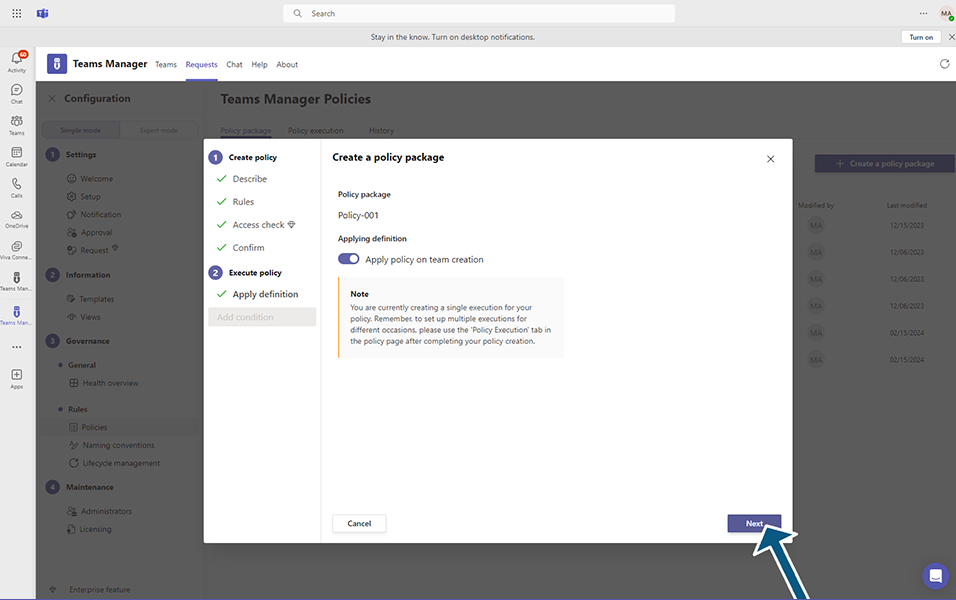
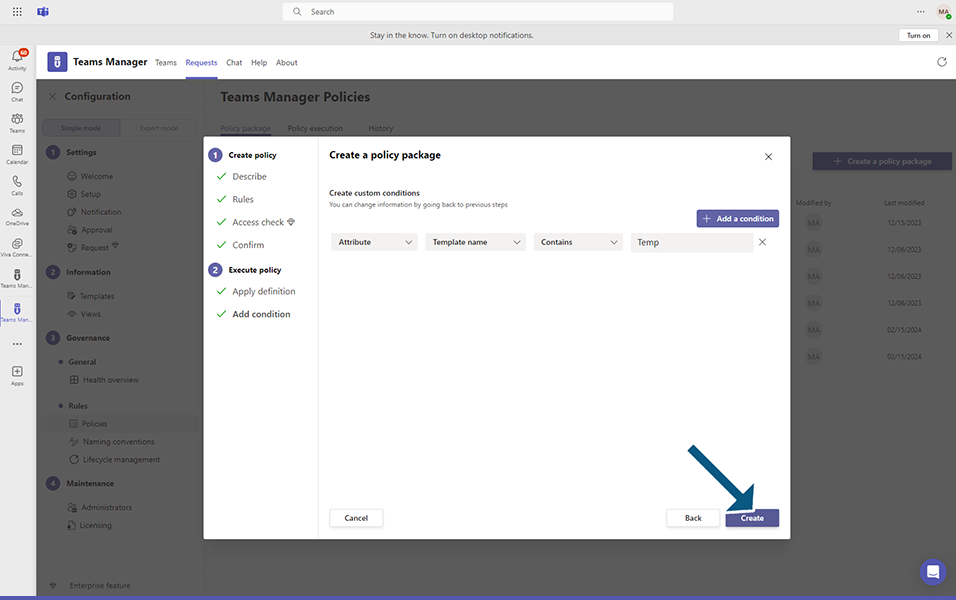
User can add a condition and Clicking on update button will create Policy execution.
Click on button Go back to Policy page.
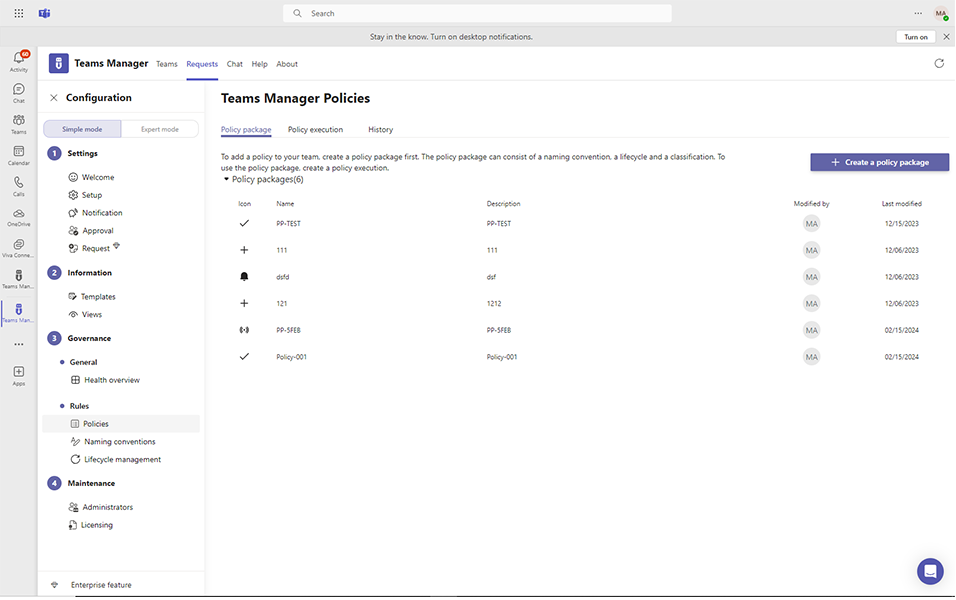
Newly created Policy package will be displayed in list view with icon "Like", "Name", "Description", "Modified by" and "Last Modified".
NOTE: Modified by is updated with the username that has modified and Last Modified is updated with the current date.
Note: When there are no policy package available in Teams Manager, following screen is displayed to the user.

This completes the functionality of Creation of Policy Package.