Create Template
Create Template
This section describes the steps for creation of Templates in Collaboration Manager 365.
1. Go to SharePoint Admin Center and click on link "Active Sites". Select the site "CM365" and click on link in "URL" field.
Note: User has to select the Site where CM365 is installed and link in URL field should be clicked on.
2. Click on link "Site Contents" in left navigation.

3. Click on link "Templates" in right panel.

4. Click on link "Create new Template".

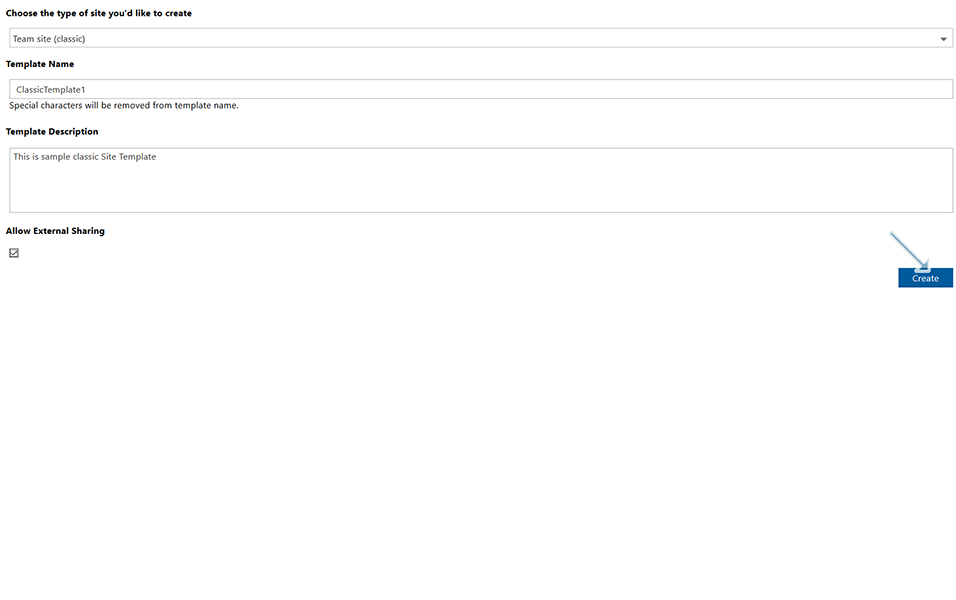
5. A new window is displayed with following fields:
a. Choose the type of site you'd like to create:
This is a drop down field wherein user can specify the type of site that need to be created. Select default type "Team site(classic)".
The Templates document library holds all Collaboration Manager 365 templates. User can select the type of site that need to be created using this drop down.
There are four different kind of templates available for the users:
1. Team Site(Classic) - User need to select Team Site(Classic) if the user wants to create a template of type "Team Site(Classic)". This is the default template type.
2. Group - User need to select Group if the user wants to create a template of type "Modern site with group".
3. Communication Site - User need to select Communication Site if the user wants to create a template of type "Communication Site".
4. Microsoft Team - User need to select Microsoft Team if the user wants to create a template of type "Microsoft Teams".
b. Template Name:
This is a text field wherein user can provide name of the template that needs to be created. This is a mandatory field for creating a template. Special Characters will be removed from template name even if user provides special characters in this field. Enter the Template name as "ClassicTemplate1"
For example, if user enter Template name as "TemplateID%%%%%%%%01", special characters will be truncated and template name will only be displayed as "TemplateID01".
Note: Template name will be used as part of the site URL.
c. Template Description:
This is a text box wherein user can provide the description about the template. This is not a mandatory field. Enter the Template description as "This is sample classic site template".
Note: This field will also be used in Wizard Web Part.
d. Allow External Sharing:
This is a checkbox and user can select this checkbox if this site can be shared by external users. Select "Allow External Sharing" checkbox and click on button "Create".
UnCheck this checkbox if user does not want to share the Site with external users.
Note: This checkbox is displayed only for template type "Team site(classic).

Note: User can create Templates of type "Group", "Communication Site" and "Teams" and the steps for creation of other template types remain the same as in mentioned here in this section Create Template.
6. Refresh the page using key "F5".
7. Newly created template "ClassicTemplate1.cm" is displayed with status as "Creating".

8. After few minutes, refresh the page again.
9. Wait until the template is created.
Note: This process can take up to 15 minutes.
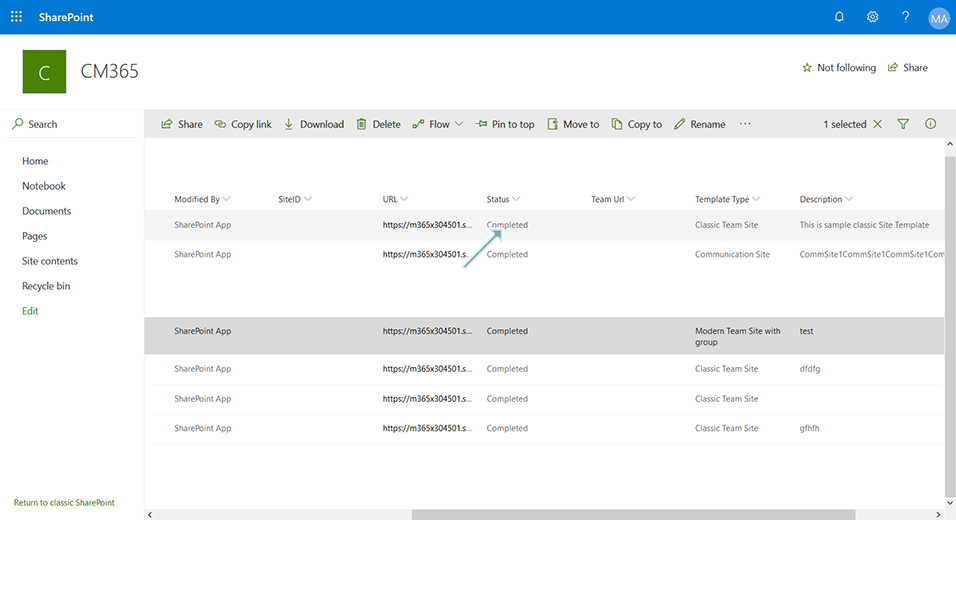
Newly created template "ClassicTemplate1.cm" is displayed in Template List view with following information updated:
a. Name: This column is updated as "ClassicTemplate1.cm".
b. Modified: This column is updated with last modified time.
c. Modified by: This column is updated with last modified user usually this field has value as "SharePoint App".
Note: This field has value as "SharePoint App" because of the App only Context which is used by Collaboration Manager 365.
d. Site ID: This field does not have any relevance and value is always empty.
e. URL: The URL of the site is automatically updated.
f. Status: This field is updated with "Completed".
Following are the other status details while creation of template:
f.1. Creating - when the template creation is initiated, status is displayed as "Creating"
f.2. Saving - when the template is modified and saved, status is displayed as "Saving"
f.3. Completed - when the template is created successfully, status is displayed as "Completed".
f.4. Error - when the template is not created successfully, status is displayed as "Error". The reason why the template creation was not successful can be observed and analyzed in Logs.
f.5. Template already exists - when the template is created with same template name, status is displayed as "Template already exists".
g. Team URL: This field is automatically updated when the site is of type "Microsoft Teams".
h. Template Type: This field is updated with "Classic Team Site".
Following are the Template type details:
h.1. Classic Team Site: This value is displayed with user selects "Team Site(Classic)".
h.2. Modern Team Site with Group: This value is displayed when user selects the type "Group".
h.3. Communication Site: This value is displayed when user selects the type "Communication Site".
h.4. Teams: This value is displayed as "Teams" when user selects the type "Microsoft Team".
i. Description: This field has the value "This is sample classic site template".
Note: Display/Hide of columns in the templates list view can be configured by the user by selecting the required fields from Show/Hide Columns.
Left click on any available column and select column settings->show/hide columns->Edit view columns->Select required columns to be displayed and click on link "Apply".

This completes the Template Creation process.